Friday, February 25, 2011

Flowers and More Flowers


I was another fun day spent with some of my sisters and sisters-in-law.  This time it was all about flowers. 


We made vintage looking flowers, rolled flowers, flowers for headbands and flowers on clips.  Actually they can all be put on headbands or used with an alligator clip because of the way we did the back.

On the back of each flower we glued a felt loop.  Two pieces of felt were sewn together down each side to create a loop in the middle.  Now we can slip a headband through the loop or put an alligator clip on it.  My girls were so excited about all their new flowers.

Knotted headband

I saw a super cute crocheted headband the other day that looked similar to this one.  I saw it on a sight called youseriouslymadethat.blogspot.com.  If you haven't seen Cami's blog, go check it out, she has some great tutorials.  Anyway, I don't crochet, so I thought I'd try braiding instead.  To figure out how long to make my braids I measured from my nose to my fingertip (I know, very scientific) 4 times for the long braid and 2 times for the short braid.  I cut three strands each length and braided them together.  Once the two braids were complete I followed Cami's tutorial on how to tie the knot and finish off the headband.
I was so easy to make that I decited to make one for myself as well :)

Wednesday, February 23, 2011

Mail Holders

I've got this area on my kitchen counter that collects bills, mail, coupons, and all kinds of other junk.  It was time for a solution.  I decided I needed some way to divide bills to pay from coupons or incoming mail, but I didn't want to go out and buy anything.  My solution:  Capri Sun boxes.

I used Capri Sun boxes just because they were the size I was looking for and I had three of them.  Next I chose some scrapbook paper, then used a little mod podge to attach it.  I love Mod Podge:) 

Now I have 3 boxes for filing mail, holding bills to pay, and keeping coupons organized and out of sight.

Friday, February 18, 2011

Faux Metal Wall Art Tutorial

Save those toilet paper rolls!  Yep, that's what these are made out of.
I started by building a frame.  I used 1/4" square dowels and cut them down into 12" pieces because I wanted my frames to be 12" x 12".  You could use balsa wood or anything else for the frames depending on how thick you want them.  I just glued the pieces together with tacky glue.  On this frame I also wanted some of the thicker wood inside the frame.
Once the frame is put together start  cutting your toiletpaper rolls.  There are two ways to cut them.  First just smash the toiletpaper roll flat and cut 1/4" pieces off the end.  This will make the leaf shapes.  The second way is to cut down the length, open it up, then cut 1/4" pieces off the end to make curls.  I cut mine 1/4" because that's how tall my frame was.  If you use taller wood simply cut the toilet paper rolls the same height as your frame.


Once you have a bunch cut start filling in your frame.  I used the end of a paint brush to curl the strips a little more and then just played around with the design and filled in the frame as I went.  Once I had the frame filled in how I wanted it I gently lifted the frame off, leaving the design in tact and then began gluing the pieces in using tacky glue.

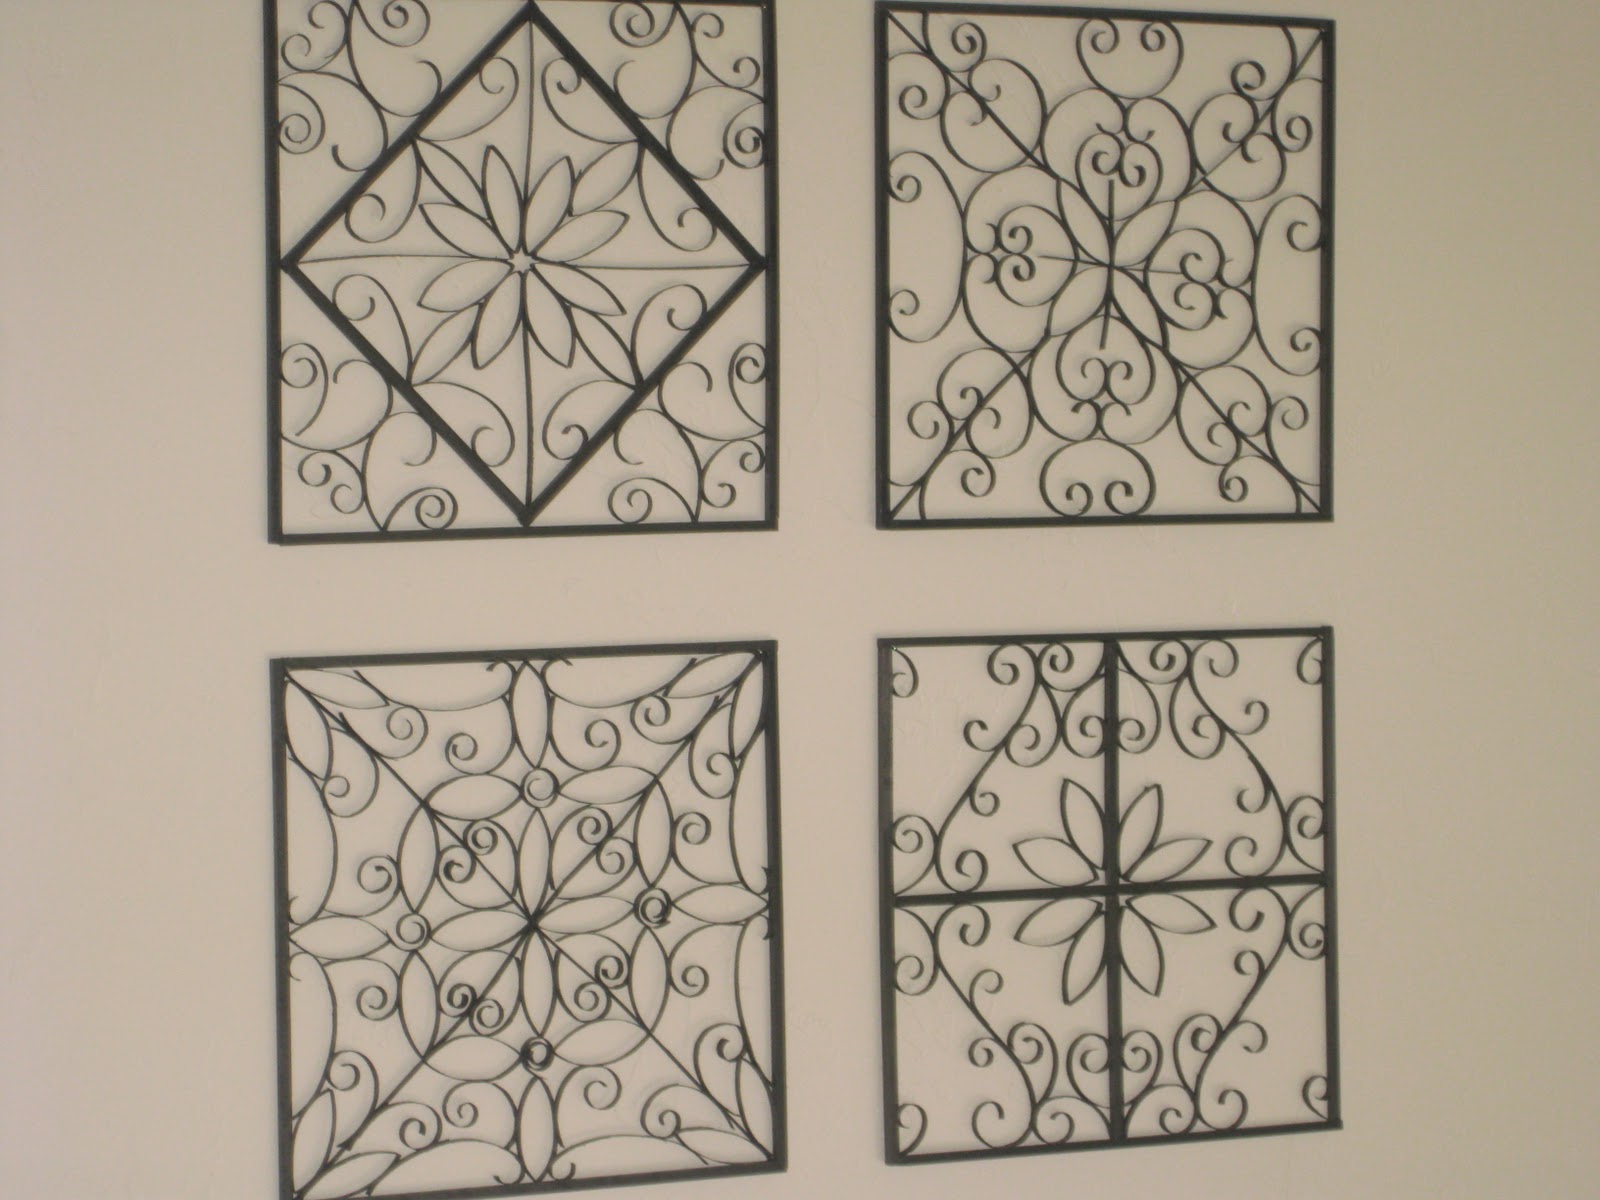
Once it was completely dry I spray painted it with a metalic spray paint in an oil rubbed bronze finish.  These are easy to make and the greatest thing it they are so budget friendly ;)  I love thrifty decorating that looks great!  And here they all are hung up on the wall:

Thursday, February 17, 2011

Valentine Pillow Cases

My two youngest absolutely love looking at pictures of themselves and their family, so for Valentine's Day I decided to make each of my kids their own pillowcase.  We had this family picture taken at Chistmas time and since it was on a white background it would work perfectly.  I got some iron-on photo paper, then made a color copy of the picture onto the photo paper.  I simply followed the instructions on the package to iron the photo onto the pillowcases.  Now my two youngest insist on bringing their pillows downstairs with them each morning when they wake up.

Sunday, February 13, 2011

A Day at the Spa

No, not for me.  For the kids.  It all started after the kids had all had baths and Cody asked if he could soak his feet in some hot water.

Soon everyone wanted a foot soak and a hot towel for their faces.


We topped off the night with a nice foot massage for everyone.  The kids felt so pampered.  They loved it!

Thursday, February 10, 2011

When you have little kids, things go missing

Last Friday I made the mistake of leaving my camera SD card in the computer.  By Saturday morning it had gone missing, so I haven't been able to post the things I was going to.  Hopefully it will turn up soon, but in the mean time this is what I've been working on this past week.

Cake Stand

I've been looking at cake stands, but they're all so plain, so when I saw this plate and matching cup at Target I decided I would make my own.  I turned the cup upside down, and with just a bit of glue, tah-dah!!  It can also double as a center piece filled with candy, lemons, twine balls, etc.

Faux Metal Wall Art

I first saw this idea on Susyssitcom.com and wanted to try out the idea. This is made entirely out of toiletpaper rolls.  You simply make a frame using balsa-wood, then fill it in with pieces cut from rolls of toiletpaper.  Once it was all done I sprayed it with a metalic spraypaint.  This was just my practice round so I didn't take any pictures as I went, but I was so thrilled with the results that I'm going to make a few more.  When I do I will post step-by-step instructions, or you can go check out susy's site.  She's got a great tutorial over there.

Tuesday, February 1, 2011

Girl's Night

All my sisters and sisters-in-law finally live within an hours drive of each other.  We decided we needed to get together every couple of months for a girl's only activity.  For our first, but not last, girl's night we decided on a craft.


There were 8 of us in all and with good food, good company and fumes from paint and glue who wouldn't want to craft :)  We had lots of fun and can't wait until our next get together.


Here are a few of our finished products:

Until next time, Happy Crafting :)